M$ Win 系统管理笔记
Win 系统使用心得与经验记录。
Windows 不能打开两个共享文件夹问题

运行一下命令:
net stop workstation /y
net start workstation
远程桌面 RDP 显示异常问题
昨天(2024.7.9) 有用户反应,他的远程桌面文字、图标偏大(与其他同样用户相比),影响使用。远程桌面的分辨率是无法设置的,故与此无关。后发现该用户 Windows(10) 未激活,出于对未激活状态感受不佳的原因,遂将该系统激活。然后打开远程桌面,文字、图标偏大的问题消失了!.......
结论:在 Windows 未激活的情况下,远程桌面会出现异常。
为 Windows 所有用户挂载 NFS 存储
首先,挂载 NFS 存储的 Windows 命令为(安装了 winfsp/nfs-win 后)。
net use z: \\nfs\10.11.1.25\rdp-1.50_share
与之相反,删除此挂载的命令为:
net use z: /del /y
可通过下面的 .bat 脚本,实现脚本化的挂载与卸载。
@echo off
if not exist z:\ (net use z: \\nfs\10.11.1.25\rdp-1.50_share )
@echo off
if exist z:\ (net use z: /del /y )
而要实现此 NFS 网盘的自动挂载,可通过在域控制器上,“服务器管理器” -> “工具” -> “组策略管理”。
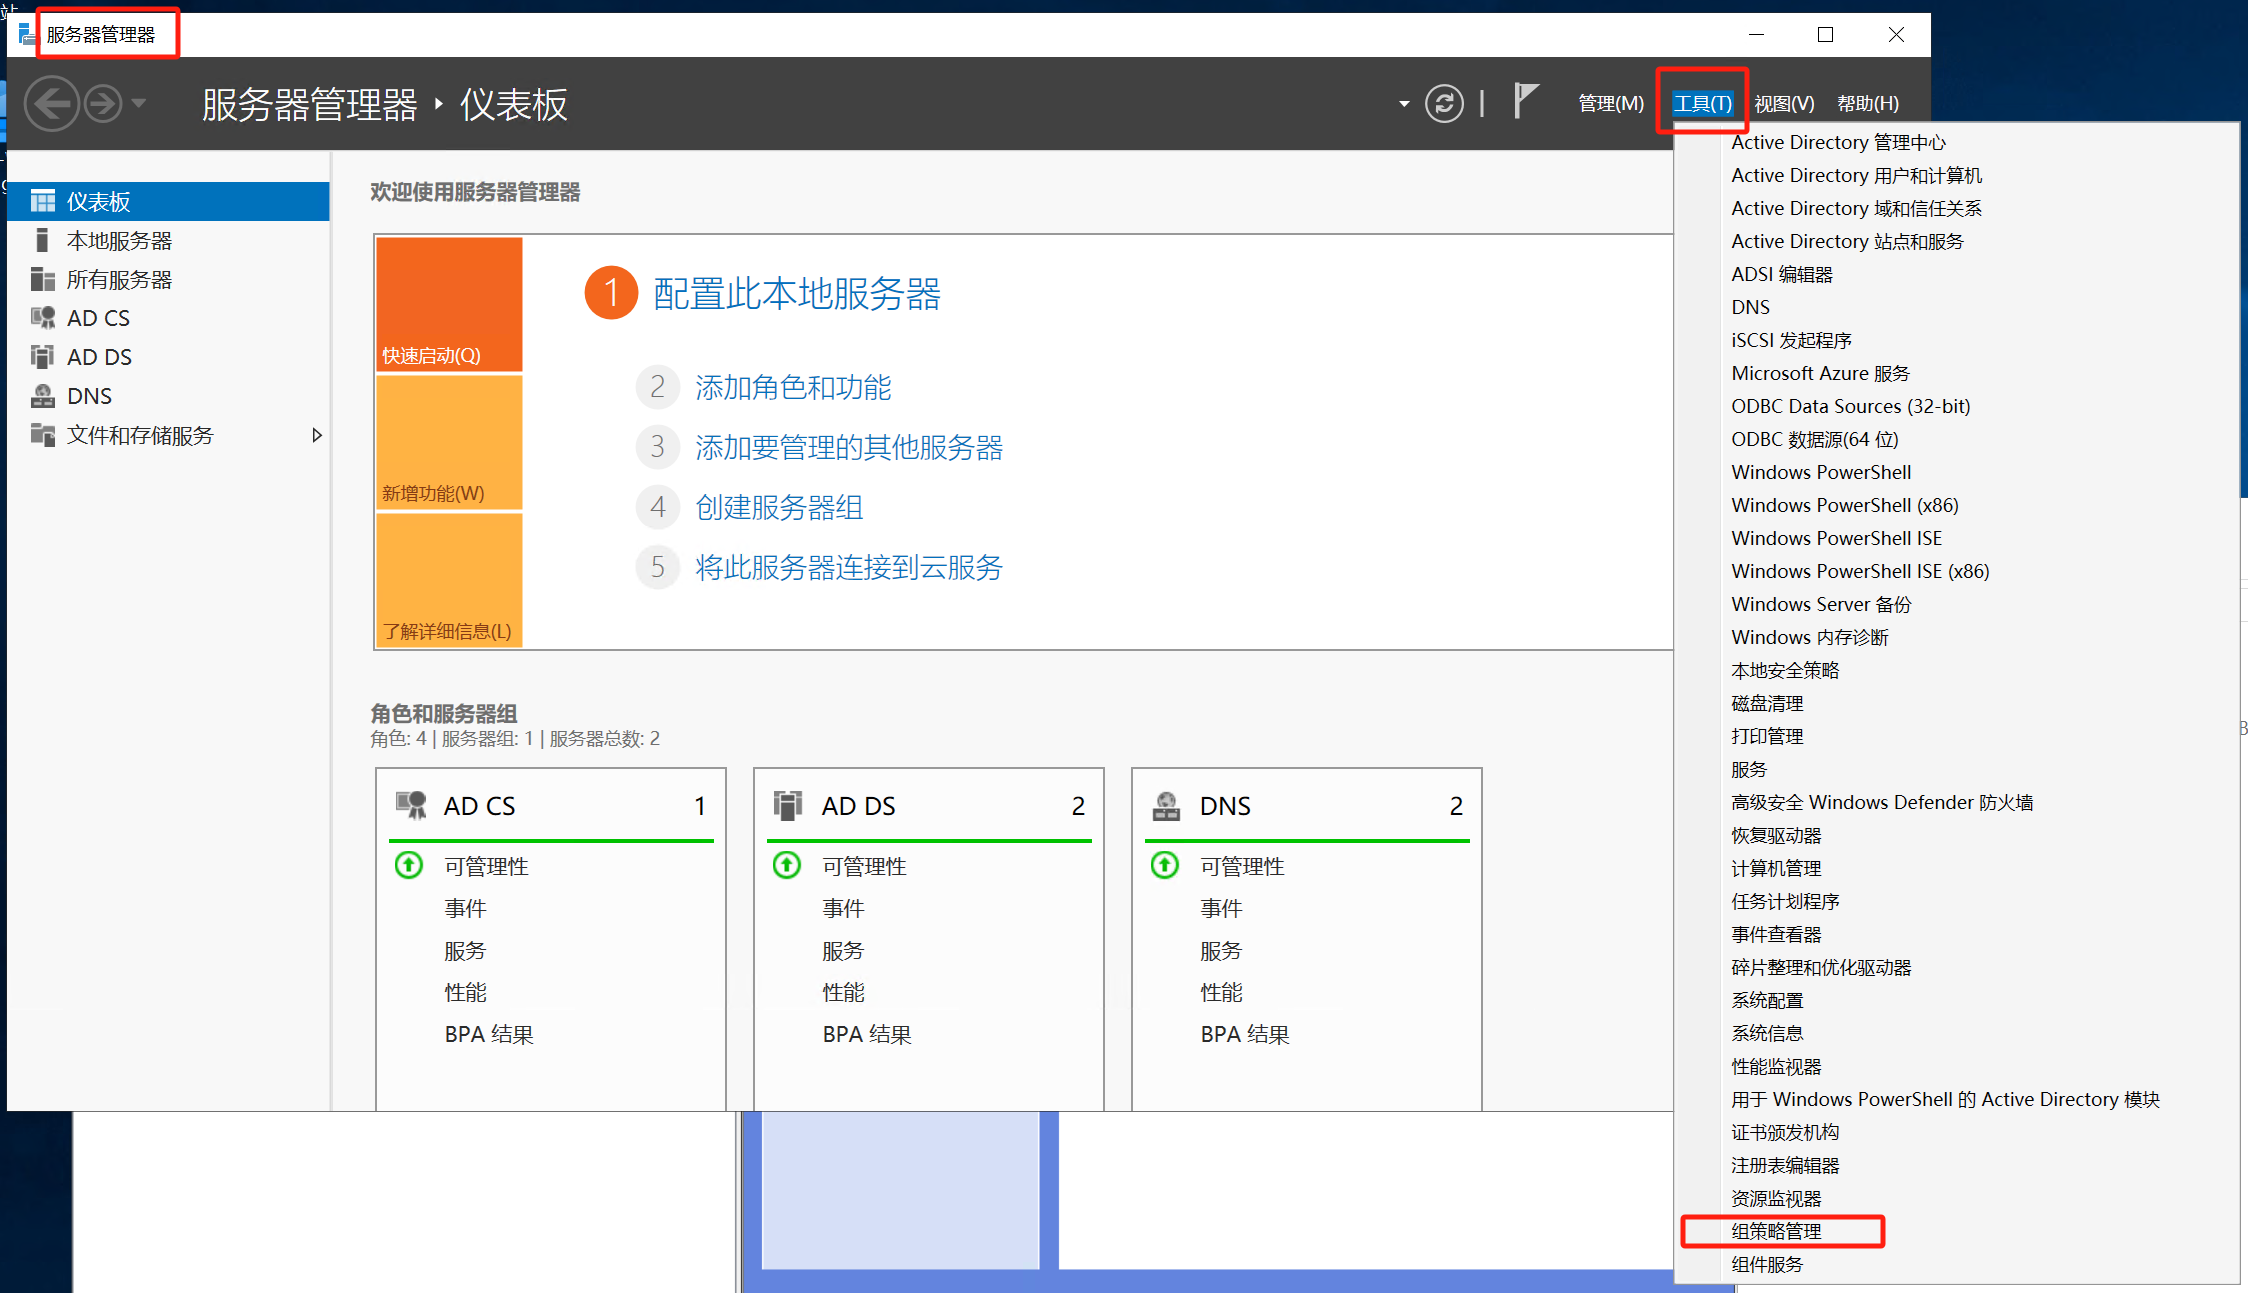
在 Default Domain Policy 上点击右键,选择 “编辑(E)”,对其进行编辑。

并在接下来的“组策略管理编辑器”中,新建出“映射驱动器”。

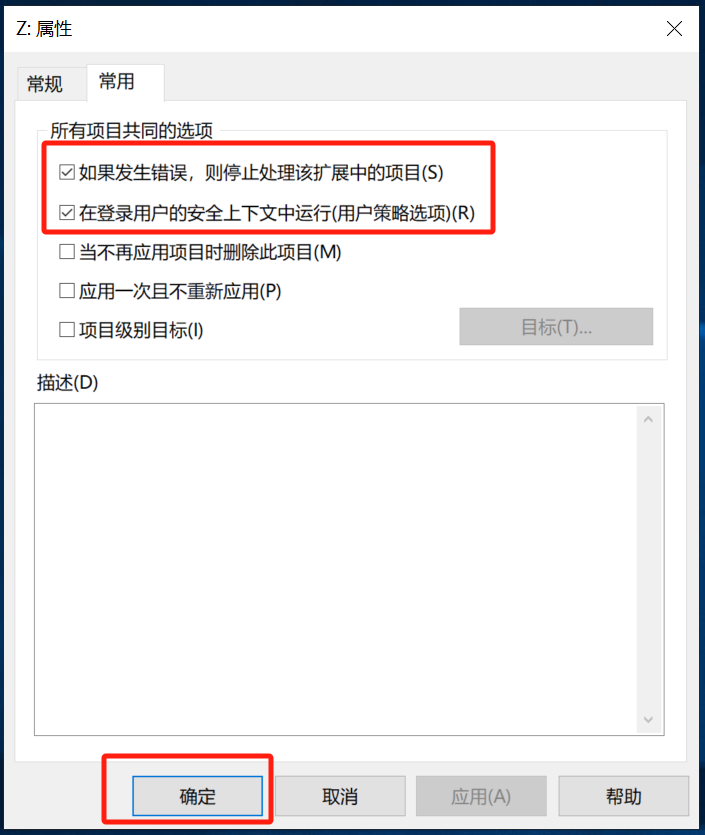
编辑“映射驱动器”的属性,如下所示。
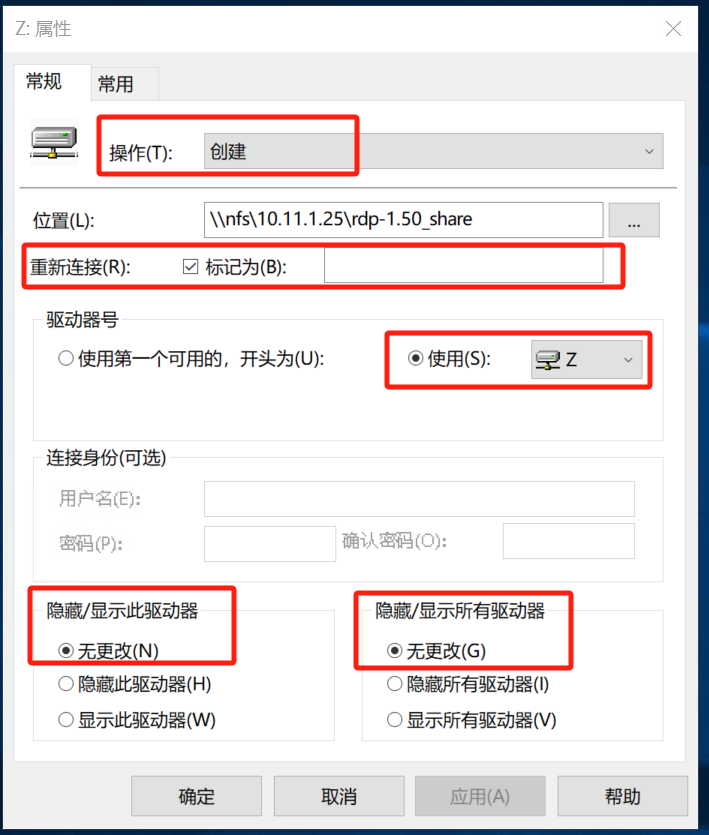
注意:这里的
//nfs/10.11.1.25/rdp-1.50_share,需要首先安装nfs-win软件。
参考:
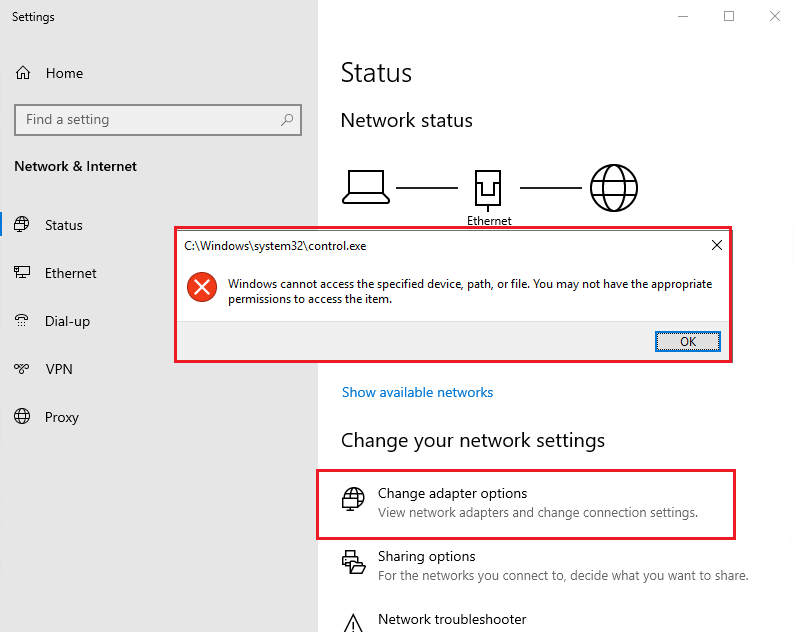
Windows 11 23H2 中,打开 “网络连接(Network Connections)” 的方式
新版本的 Windows 11 中,已经无法从“设置”,访问到“网络连接”。要打开“网络连接”,需如下操作:
-
按下 "Win + Q"
-
输入
ncpa.cpl,按回车打开 “网络连接” 窗口
Windows 11 (未激活?)无法登录系统
今天收到用户 Windows 11 疑似因未激活,在重启时需登录 Microsoft 账号而卡住无法登录的情况。在卡住时,按下 Ctrl-Alt-Del,会调出 “任务管理器”界面,点击 “注销” 后,会来到登录界面,此时可用本地账号登录。
Windows 家庭版创建账号
按下 Win+R,输入 control userpasswords2,在打开的 “用户账户” 界面中,添加普通用户或管理员的用户。
AD 域服务器多个子网与路由问题
- 打开 “Active Directory 站点和服务管理单元”, the Active Directory Sites and Services snap-in;

-
右击
Subnets容器,并选择新建子网; -
输入地址和掩码,并在随后选择该子网是哪个站点的一部分;
-
点击
OK。
注意:一台服务器接入多个网卡后,会出现路由问题。此时,需要使用 route 命令,删除默认路由并建立正确的默认永久路由。
route delete 0.0.0.0
route add 0.0.0.0 mask 0.0.0.0 10.11.0.254 -p
C:\Windows\system32\control.exe 权限问题(Server 2019)
参考:Windows Server 2019 Standard - Active Directory Domain Services
在修改网卡参数时,会碰到这个问题。
解决办法:
前往 Local Security Policy -> Local Policies -> Security Options -> User Account Control: Admin Approval Mode for the Built-in Administrator account, 启用这个选项。重启服务器并再度尝试,便可修复此问题。
本地安全策略 -> 本地策略 -> 安全选项 -> 用户账户控制:用于内置管理员账户的管理员批准模式。
W32Time 服务无法启动
使用 net start w32time,或在 服务Services 管理程序中启动 W32Time 服务时,可能遇到该服务无法启动的问题。原因是 windows time 服务失效。
修复:在提升权限的 CMD 窗口中,键入 w32tm /register,将输出:W32Time 成功注册。此时再使用 net start "windows time",或 net start w32time 命令,启动该服务。
参考:windows time 服务无法启动解决方法:w32tm /register
Windows DNS 解析异常的一种情况
今天(2024-03-02),在手动设置了一个 IPv4 的 DNS 服务器情况下,在终端中运行 nslookup dc.xfoss.com,仍未能得到正确的 IP 地址。
发现 Windows 系统会在手动设置了 IPv4 的地址情况下,仍然使用 IPv6 的 DNS 服务器,去解析域名。而在关掉系统的 IPv6 协议后,系统便能通过手动设置的 IPv4 DNS 服务器地址,去解析域名。
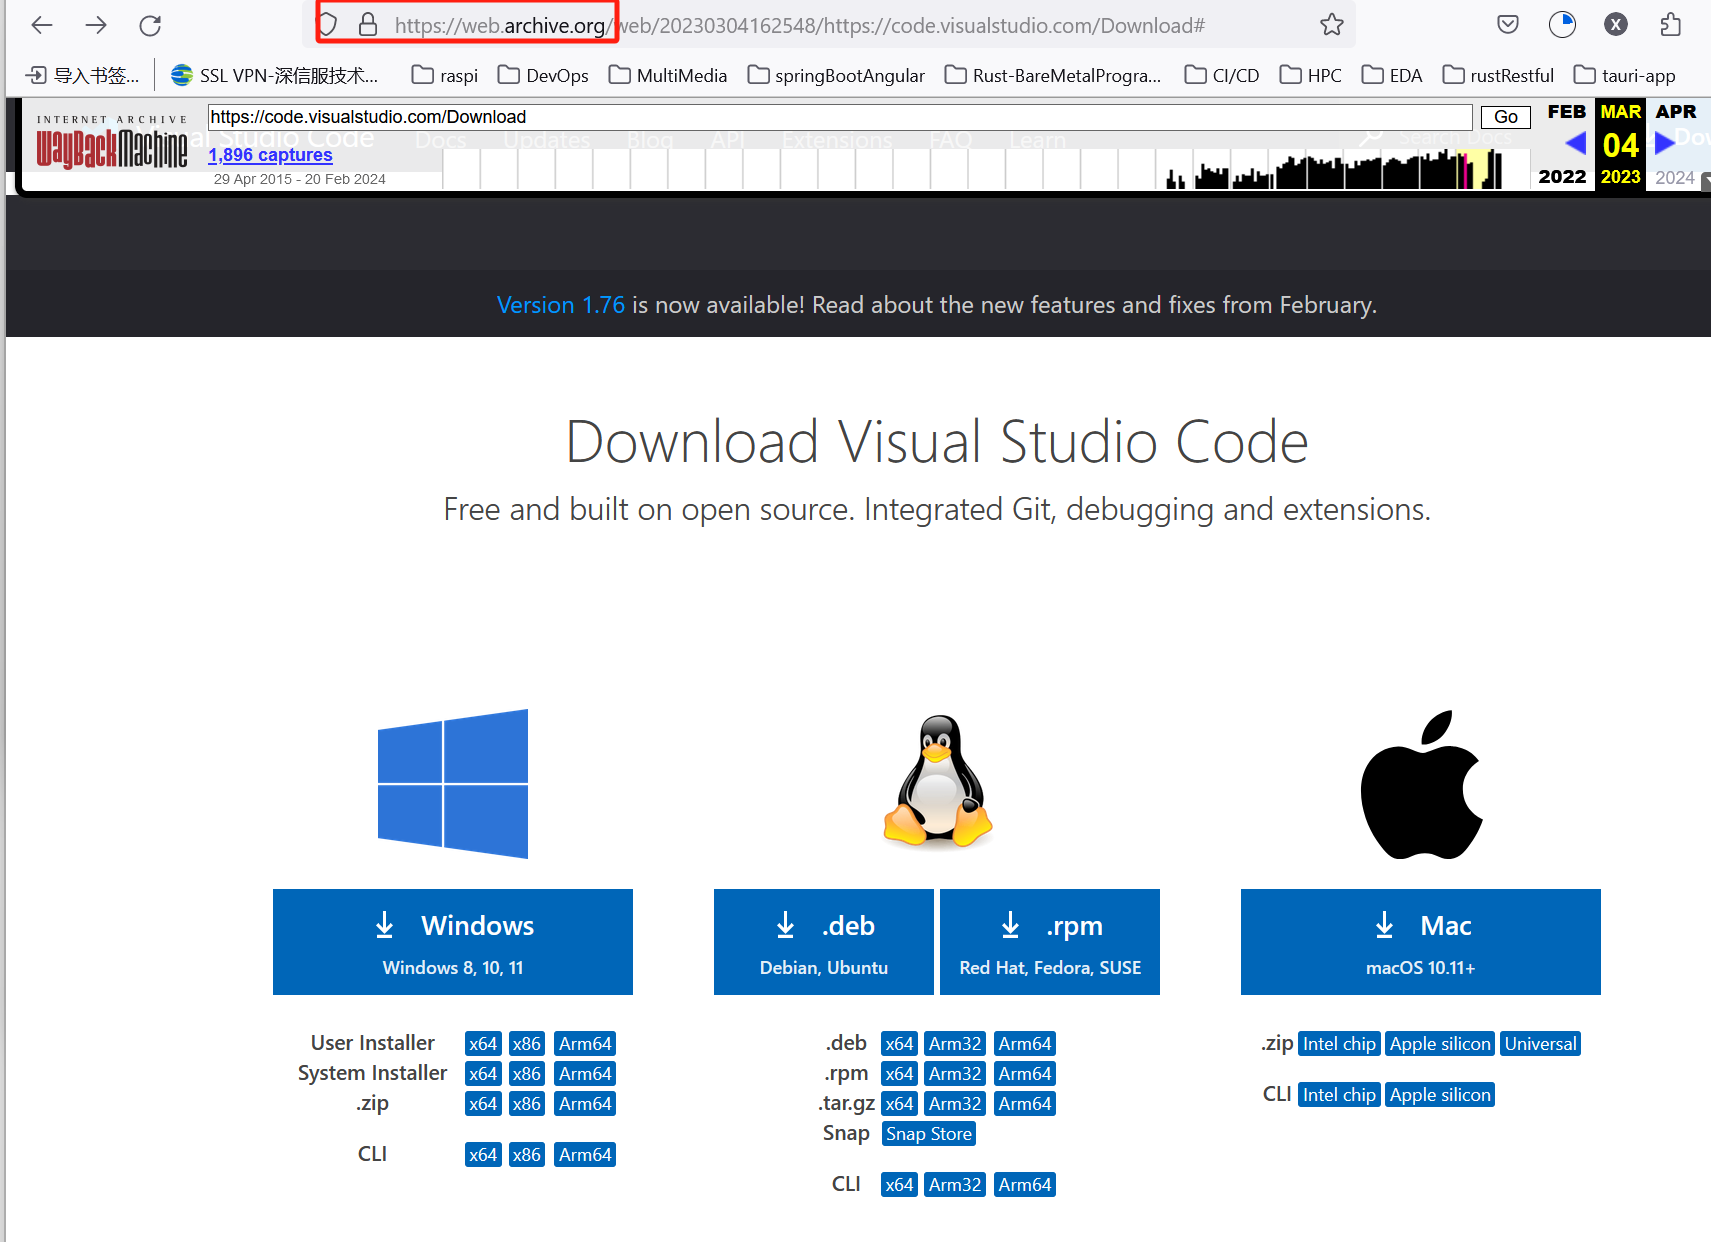
通过 Internet Archive: Wayback Machine 时光机,找到旧版 VS Code
今天(2024-02-20)要在一台 Windows Server 2012 R2 机器上,安装 system-wide 的 VS Code,但新版本的 VS Code System Installer(VS Code 安装程序,分 User Installer 和 System Installer),已经不支持 Server 2012 R2 了。因此要找到支持该 Windows 版本的 System Installer。
通过 Google 就很难找到,偶然想到互联网档案馆上,应该有存档。于是就使用互联网档案馆的
查看 VS Code 下载页面:https://code.visualstudio.com/Download 的历史版本,最终找到 2023 年 3 月的 VS Code 发布,成功在 Server 2012 R2 的机器上,安装了其 System Installer。
更新(2024/10/15):可通过 VSCode 插件的 Version History -> CHANGELOG,找到插件历史插件版本对应的发布日期,与所安装的 VSCode 版本发布日期相比较获取到版本号,然后利用现有下载链接,替换咱们所需的版本号,下载到该插件的历史版本。
“Microsoft IME 已停止工作”
Windows Server 2012 R2 单个用户下,会偶发此问题,如下图所示:
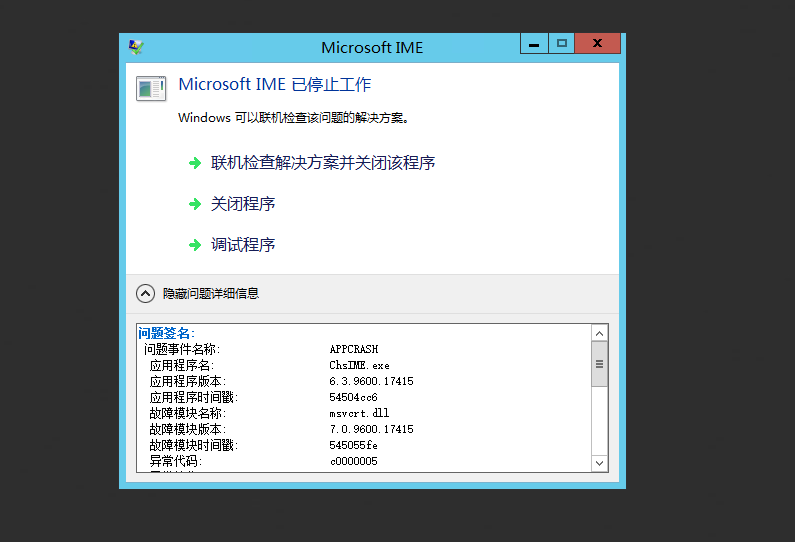
解决办法:在输入法中,删除 “微软拼音输入法”。
参考连接:Microsoft IME 已停止工作
Win Server “拒绝请求的会话访问” 问题解决
参考连接:
解决方法:
- 按 "Win + R", 打开运行对话框,然后输入
sysdm.cpl并点击 “确定”,打开系统属性;
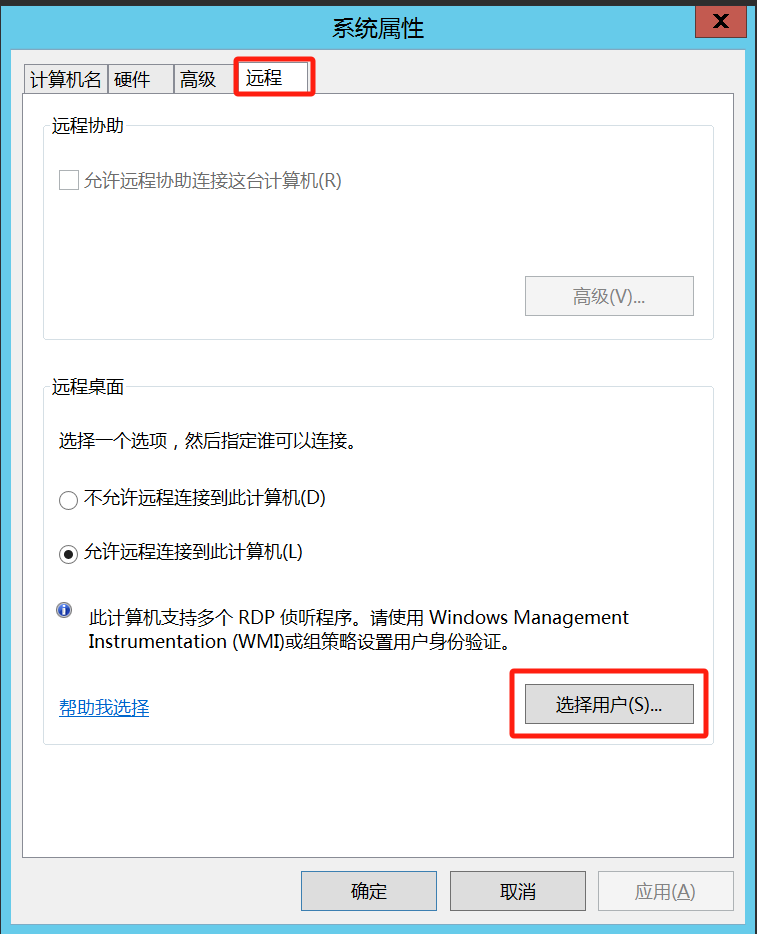
-
单击 “远程” 选项卡,然后单击远程桌面中的 “选择用户”;
-
在弹出的对话框中,单击 “添加”,然后再目标区域中输入用户名,再单击 “检查名称” 进行添加。
使用 RDP Wrapper 实现多用户同时 RDP
RDP Wrapper: stascorp/rdpwrap,该项目的目标是在家用较弱的系统上,实现远程桌面主机支持和并发 RDP 会话。
RDP Wrapper 可作为服务控制管理器,Service Control Manager,和终端服务,Terminal Serices,之间的一个层,因此原始 termsrv.dll 文件不会受到影响。此外,这种方法对抗 Windows Update 的能力很强。
使用 RDP Wrapper 需要结合 sebaxakerhtc/rdpwrap.ini,根据 termsrv.dll,在这个代码仓库中查找适合的 rdpwrap.ini 配置文件,并使用对应的配置文件,替换(管理员下编辑) C:\Program Files\RDP Wrapper\ 文件夹下的 rdpwrap.ini。
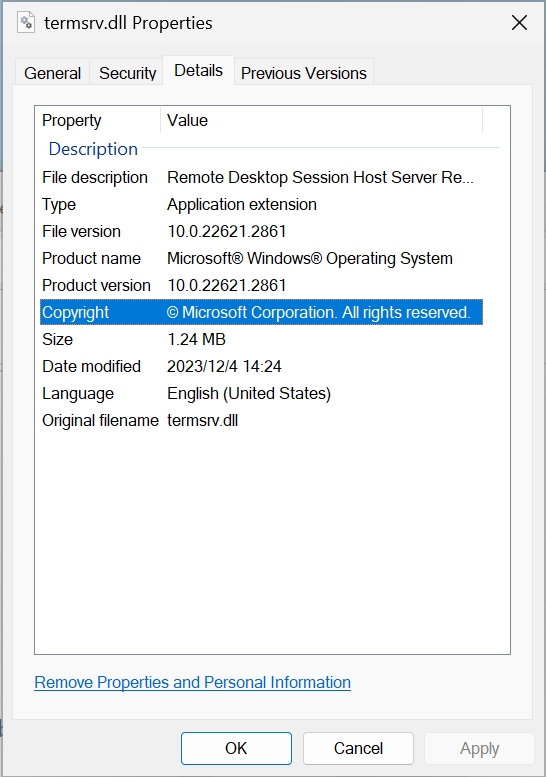
若在 sebaxakerhtc/rdpwrap.ini 上找不到对应 termsrv.dll 版本的 rdpwrap.ini,可使用 llccd/RDPWrapOffsetFinder 工具,生成系统当前 termsrv.dll 版本的 rdpwrap.ini 配置,亲测可用。
本地 AD 密码同步到 Azure Ad 的问题
本地修改密码后,应等待 5 分钟到本地 AD 密码同步到 Azure AD 后,再登录激活 Office365。
Wins 安装过程中,激活码的问题
微软有专门的 KMS Client Setup Keys。
- 打开命令行提示符界面 CMD,输入:
slmgr /ipk W269N-WFGWX-YVC9B-4J6C9-T83GX
- 输入
slmgr /skms kms.03k.org
- 最后输入
slmgr /ato
查看激活状态。
或者在 Powersehll(管理员)中,输入
irm massgrave.dev/get.ps1 | iex
使用线上的 ps1 脚本激活。
注意:若
%windir%\System32\config\systemprofile这样的路径没有权限,那么上面的命令将报出错误:0x80070005 拒绝访问:所请求的操作需要提升特权。因此需要Administrators用户具有对这个路径的权限。
Win11 22h2 安装过程中跳过 “Let's connect you to a network”
在这个界面,按下 Shift + F10,于命令行中输入 OOBE\BYPASSNRO,之后机器将重启,且 out-of-box eperience, OOBE 将再次启动。
Win 系统下软件安装的几种方式
这里要讨论的,并非习以为常的经由下载安装程序并运行,或是从应用商店 App Store 安全软件。而是一些另类的软件安装方式。
chocolatey.exe 方式
chocolatey.org,提出 Win 系统包管理器的概念,并声称其为 “现代的软件自动化”。实际使用起来,也较为方便。
PS C:\Windows\system32> choco help
Chocolatey v1.1.0
This is a listing of all of the different things you can pass to choco.

DEPRECATION NOTICE

The shims `chocolatey`, `cinst`, `clist`, `cpush`, `cuninst` and `cup` are deprecated.
We recommend updating all scripts to use their full command equivalent as these will be
removed in v2.0.0 of Chocolatey.

Options and Switches

 -v, --version
     Version - Prints out the Chocolatey version. Available in 0.9.9+.

Commands

 * find - searches remote or local packages (alias for search)
 * list - lists remote or local packages
 * search - searches remote or local packages
 * help - displays top level help information for choco
 * info - retrieves package information. Shorthand for choco search pkgname --exact --verbose
 * install - installs packages using configured sources
 * pin - suppress upgrades for a package
 * outdated - retrieves information about packages that are outdated. Similar to upgrade all --noop
 * upgrade - upgrades packages from various sources
 * uninstall - uninstalls a package
 * pack - packages nuspec, scripts, and other Chocolatey package resources into a nupkg file
 * push - pushes a compiled nupkg to a source
 * new - creates template files for creating a new Chocolatey package
 * sources - view and configure default sources (alias for source)
 * source - view and configure default sources
 * config - Retrieve and configure config file settings
 * feature - view and configure choco features
 * features - view and configure choco features (alias for feature)
 * setapikey - retrieves, saves or deletes an apikey for a particular source (alias for apikey)
 * apikey - retrieves, saves or deletes an apikey for a particular source
 * unpackself - re-installs Chocolatey base files
 * export - exports list of currently installed packages
 * template - get information about installed templates
 * templates - get information about installed templates (alias for template)


Please run chocolatey with `choco command -help` for specific help on
 each command.
在 choco 下使用代理安装软件示例:
choco install -y baidupcs-go --proxy="http://192.168.30.51:3128" --force
MSYS2 方式
MSYS2 亦可经由
choco.exe加以安装。
msys2.org: MSYS2 是为构建、安装及运行原生 Windows 软件的易于上手环境,而提供的一些工具与库的集合。
其包含了叫做
mintty的一个命令行终端、bash、诸如git及subversion, svn等版本管理工具,以及像是tar与awk,甚至像autotools这样的构建系统,全部都是基于修改版的Cygwin。
在 MSYS2 中添加有空格的路径到 PATH 环境变量时,应采取以下的处理:
export PATH=$PATH:/c/Users/Lenny.Peng/.cargo/bin:/c/Program\ Files/Eclipse\ Adoptium/jre-11.0.19.7-hotspot/bin
export JAVA_HOME=/c/Program\ Files/Eclipse\ Adoptium/jre-11.0.19.7-hotspot
需要在路径中的空格前添加 \ 进行转义。
参见:Declaring space characters in PATH for MSYS2 - Windows
将 MSYS2 的 SHELLL 修改为 ZSH:
-
先在 MSYS2 中安装 ZSH:
pacman -S zsh; -
然后在桌面建立快捷方式:
C:\msys64\msys2_shell.cmd -mingw64 -shell zsh; -
或在
msys2.ini配置文件中,加入SHELL=/usr/bin/zsh。
参见:Change default shell on MSYS2
获得完整的 ZSH 体验
-
利用 zsh-users/Antigen 项目获得完整的 ZSH 体验;
-
其中会报出安装
zsh-users/zsh-syntax-hightlighting失败,此时可手动运行:
git clone https://github.com/zsh-users/zsh-syntax-highlighting.git
echo "source ${(q-)PWD}/zsh-syntax-highlighting/zsh-syntax-highlighting.zsh" >> ${ZDOTDIR:-$HOME}/.zshrc
安装这个主题。
winget 方式
首先使用 winget search foobar 搜索要安装的软件,比如:
> winget search obs
尝试更新源失败: winget
名称                          ID                                 版本         匹配             源
------------------------------------------------------------------------------------------------------
OBS Studio                    XPFFH613W8V6LV                     Unknown                       msstore
NASA Earth Observatory        9WZDNCRFJ252                       Unknown                       msstore
European Southern Observatory 9WZDNCRDF64K                       Unknown                       msstore
Obscure Extractor             9NXLQD97BT9Z                       Unknown                       msstore
OBS Studio                    OBSProject.OBSStudio               29.1.3       Moniker: obs     winget
哔哩哔哩直播姬                Bilibili.Livehime                  4.48.0.5057  Tag: obs         winget
StreamlabsOBS                 Streamlabs.StreamlabsOBS           0.23.2                        winget
Stinker                       PatentLobster.stinker              0.2.3                         winget
OpenObserve                   openobserve.openobserve            0.4.7                         winget
AMD Encoder for OBS Studio    OBSProject.obs-amd-encoder         2.6.0.0                       winget
MonkeyMote 4 Foobar           ObsidiumSoftware.MonkeyMote4Foobar 3.4.0.3                       winget
Hindsight                     obsidianforensics.HindsightGUI     2023.03                       winget
Obsidian                      Obsidian.Obsidian                  1.3.5                         winget
OBS RTSP Server Plugin        iamscottxu.obs-rtspserver          3.0.0                         winget
obs-virtualcam                Fenrirthviti.obs-virtual-cam       2.0.5                         winget
Mobster                       dillonkearns.mobster               0.0.48                        winget
obs-asio                      Andersama.obs-asio                 3.1.0                         winget
blobsaver                     Airsquared.Blobsaver               3.5.1                         winget
OBS Studio Beta               OBSProject.OBSStudio.Pre-release   29.1.0-beta3                  winget
Streamlabs Desktop            Streamlabs.Streamlabs              1.11.1                        winget
Deckboard                     RivaFarabi.Deckboard               2.1.3        Tag: obs-remote  winget
Quarto                        Posit.Quarto                       1.3.433      Tag: observable  winget
.NET Reactor                  Eziriz.DotNetReactor               6.8.0.0      Tag: obsfucation winget
Aladin                        CDS.AladinDesktop                  11.024       Tag: observatory winget
然后使用打算安装软件的 ID 字段,运行下面的命令安装该软件。
winget install OBSProject.OBSStudio
winget的命令:Commands
scoop.sh 方式
scoop.sh 是另一个 Windows 的命令行安装程序。
Scoop 从命令行中安装咱们所知道和喜爱的程序,而且摩擦最小。他:
- 消除权限弹出窗口
- 隐藏 GUI 向导式安装程序
- 防止安装大量程序造成
PATH污染 - 避免因安装和卸载程序而产生的意外副作用
- 自动查找并安装依赖项
- 自行执行所有额外的设置步骤以获得工作的程序
删除用户配置文件
在删除 Win 系统用户时,除了要在 “计算机管理” 中删除用户,还要删除用户配置文件。有两种方式:
- 前往
C:/Users/目录,删除对应用户名的文件夹; - “我的电脑” -> “属性” -> "高级系统设置" -> “用户配置文件” -> “设置”
首选第二种方式;因为第一种删除文件夹的方式,可能出现权限问题删除不了,而第二种方式则没有这方面的问题。
安装 OpenSSH-server
参考:Installing SFTP/SSH Server on Windows using OpenSSH
安装 SFTP/SSH Server
-
在 Windows 11 上
- 前往 “设置” -> “应用” -> “可选功能”;
- 找到 “OpenSSH 服务器”,选中他,然后点击安装。
-
在 Windows 10 上
- 前往 “设置” -> “应用及功能” -> “添加功能”;
- 找到 “OpenSSH 服务器”,选中他,然后点击安装。
二进制程序会被安装到 %WINDIR%\System32\OpenSSH。配置文件 sshd_config 及主机密钥会安装到 %ProgramData%\ssh(只有在服务器首次启动后才会有)。
配置 SSH 服务器
- 在 Windows 防火墙中放行到 SSH 服务器的入站连接:
- 在作为可选功能安装完成时,防火墙规则
OpenSSH SSH Server (sshd)应已被自动创建。若没有自动创建此规则,请如下创建并启用此规则。 - 作为管理员运行下面的命令:
- 在作为可选功能安装完成时,防火墙规则
New-NetFirewallRule -Name sshd -DisplayName 'OpenSSH SSH Server' -Enabled True -Direction Inbound -Protocol TCP -Action Allow -LocalPort 22 -Program "C:\Windows\System32\OpenSSH\sshd.exe"
请将 C:\Windows\System32\OpenSSH\sshd.exe 替换为到 sshd.exe 的实际路径(若手动安装 OpenSSH-Server, 即为:C:\Program Files\OpenSSH\ssh.exe)。
- 或前往
Windows 安全->防火墙与安全->管理工具,并打开服务。找到OpenSSH SSH 服务器服务。
- 启动服务及/或配置自动启动:
- 前往
控制面板->系统与安全->管理工具并打开服务。找到OpenSSH SSH 服务器服务; - 若咱们希望在机器启动时服务器自动启动:请前往
操作->属性(或直接双击该服务)。在属性对话框中,修改启动类型为自动并确定. - 通过点击
启动按钮启动OpenSSH SSH 服务器,或者点击菜单中的操作->启动。
- 前往
AD 下用户证书申请与导出
申请新证书
在 “管理控制台” (按下 Win + R 输入 mmc 打开)中,“文件” -> “添加/删除管理单元” -> “证书” -> “我的用户账户”,在 “个人” 上点击右键,选择 “所有任务” -> “申请新证书”
导出证书
需要选择 “导出私钥” 选项,必要时为证书设置密码。
“Internet 选项” 中 SSL/TLS 相关设置被修改的问题
参考:
Win 系统中 “Internet 选项” 中,SSL/TLS 设置不当,会导致无法连接到相关服务。有的时候这些设置会被未知程序修改。可在 “管理员终端,Windows Powershell(Admin)” 里,运行注册表命令快速设置。
reg add "HKCU\Software\Microsoft\Windows\CurrentVersion\Internet Settings" /v SecureProtocols /t REG_DWORD /d 2728 /f
其中的 2728 是表示 SSL/TLS 设置组合的代码,不同组合有不同的代码。
使用 sshfs-win 映射网络位置
安装 sshfs-win:
choco install -y sshfs
或
winget install WinFsp.WinFsp; winget install SSHFS-Win.SSHFS-Win
然后映射一个网络驱动器到指定位置:
\\sshfs\REMUSER@HOST[\PATH]
Windows 下 Docker 运行的一个问题
Windows 系统上通过运行:
choco install -y docker-for-windows
即可安装 Docker 环境。
报出:
> docker image ls -a
error during connect: in the default daemon configuration on Windows, the docker client must be run with elevated privileges to connect: Get "http://%2F%2F.%2Fpipe%2Fdocker_engine/v1.24/images/json?all=1": open //./pipe/docker_engine: The system cannot find the file specified.
此问题在 docker: error during connect: In the default daemon configuration on Windows, the docker client must be run with elevated privileges to connect 上有讨论,并按照 这个帖子 操作并重启计算机后,即可解决。所需执行的操作如下(均需在管理员终端下运行):
- 更新
wsl内核,显然这是必须的,因为docker需要他,而他在默认情况下是不安装的:
wsl --update
- 运行下面的命令:
& 'C:\Program Files\Docker\Docker\DockerCli.exe' -SwitchDaemon
重启系统后,Docker Desktop 会随系统启动自动运行。
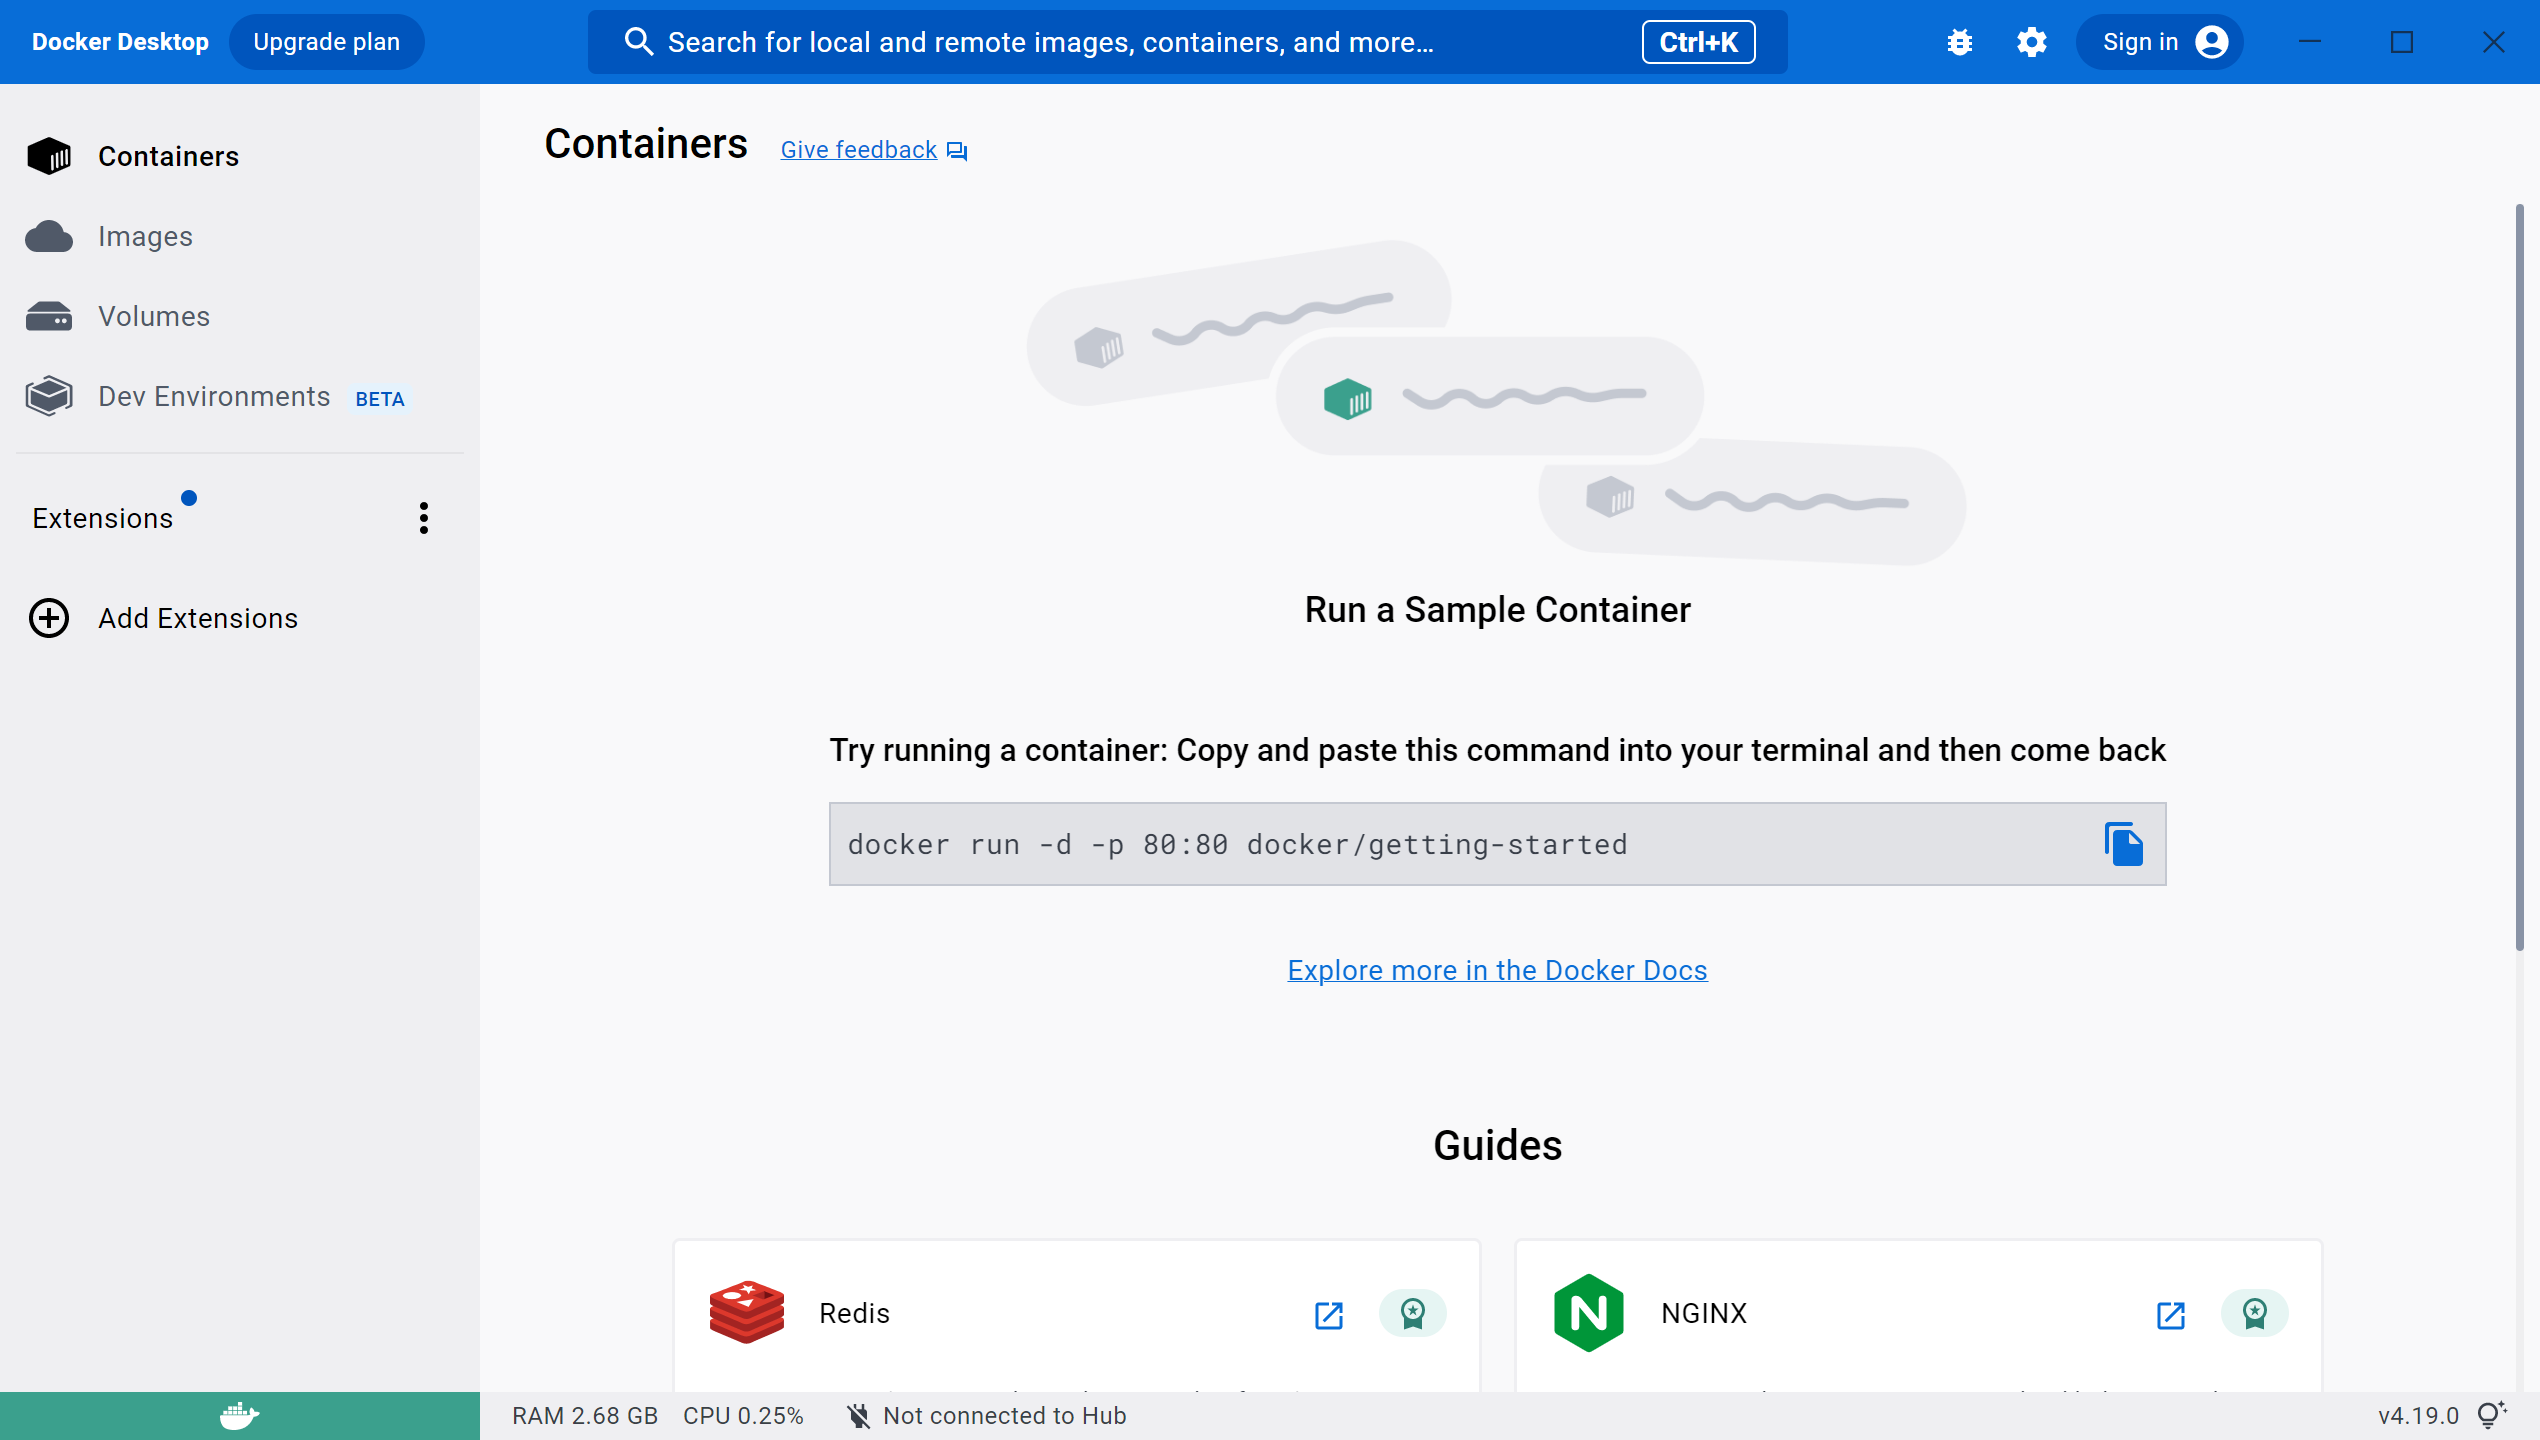
注意:
docker-desktop需要管理员权限运行,否则在启动容器时会报错。
O365 激活操作
摘录参考自:kms-activate
O365 Retail 版转换为 VOL 版并激活的步骤(以下命令需再管理员 CMD 窗口执行,管理员 Powershell 终端窗口无效):
- 进入
ospp.vbs所在的目录
cd C:\Program Files\Microsoft Office\Office16
- 将 Retail 版转化为 VOL 版
for /f %x in ('dir /b ..\root\Licenses16\proplusvl_kms*.xrm-ms') do cscript ospp.vbs /inslic:"..\root\Licenses16\%x"
for /f %x in ('dir /b ..\root\Licenses16\proplusvl_mak*.xrm-ms') do cscript ospp.vbs /inslic:"..\root\Licenses16\%x"
- 安装 KMS 激活密钥
cscript ospp.vbs /inpkey:XQNVK-8JYDB-WJ9W3-YJ8YR-WFG99
关于 KMS 激活密钥,请参考:Microsoft Office 2019 RTM GVLK Keys
- 激活
cscript ospp.vbs /sethst:kms.03k.org && cscript ospp.vbs /act
- 可用的 KMS 服务器地址汇总
可同时激活 Windows 和 Office。
kms.03k.org
kms.chinancce.com
kms.luody.info
kms.lotro.cc
kms.luochenzhimu.com
kms8.MSGuides.com
kms9.MSGuides.com
参考:适用于windows && office 可用kms服务器激活地址汇总
msys2 下 /home 位置
执行 pwd -W 命令,即可找出 /home 的位置:
 MSYS ~
$ pwd -W
C:/tools/msys64/home/Lenny.Peng
OneDrive 无法登录问题
在 OneDrive 遇到无法登录问题时,需暂时打开全局代理(并关闭 AutoProxy PAC),让 OneDrive 完成登录,得到相应登录凭据,随后便可以关闭全局代理。
限制 wsl 内存使用
# 关闭全部 wsl 示例,比如 docker-desktop
wsl --shutdown
notepad "$env:USERPROFILE/.wslconfig"
设置咱们希望的 CPU 核数与内存值:
[wsl2]
memory=3GB   # Limits VM memory in WSL 2 up to 3GB
processors=2 # Makes the WSL 2 VM use two virtual processors
Powershell 中设置环境变量
例如:
$env:JENKINS_URL = 'https://ci.xfoss.com'
检查环境变量:
> dir env:

Name                           Value
----                           -----
ALLUSERSPROFILE                C:\ProgramData
APPDATA                        C:\Users\Lenny.Peng\AppData\Roaming
ChocolateyInstall              C:\ProgramData\chocolatey
ChocolateyLastPathUpdate       133328263824380565
ChocolateyToolsLocation        C:\tools
CommonProgramFiles             C:\Program Files\Common Files
CommonProgramFiles(x86)        C:\Program Files (x86)\Common Files
CommonProgramW6432             C:\Program Files\Common Files
COMPUTERNAME                   PC-SSZ063-1
ComSpec                        C:\WINDOWS\system32\cmd.exe
DEFLOGDIR                      C:\ProgramData\McAfee\Endpoint Security\Logs
DriverData                     C:\Windows\System32\Drivers\DriverData
GROOVY_HOME                    C:\tools\groovy-3.0.14
HOMEDRIVE                      C:
HOMEPATH                       \Users\Lenny.Peng
JENKINS_URL                    https://ci.xfoss.com
JMETER_HOME                    C:\ProgramData\chocolatey\lib\jmeter\tools\apache-jmeter-5.5
LOCALAPPDATA                   C:\Users\Lenny.Peng\AppData\Local
LOGONSERVER                    \\DC-SZ2
NUMBER_OF_PROCESSORS           8
NVM_HOME                       C:\Users\Lenny.Peng\AppData\Roaming\nvm
NVM_SYMLINK                    C:\Program Files\nodejs
OS                             Windows_NT
Path                           C:\Program Files\Eclipse Adoptium\jre-11.0.19.7-hotspot\bin;C:\Python311\Scripts\;C:\Python311\;C:\S2C\PlayerPro_Runtime\bin;C:\WINDOWS\system32;C:\WINDOWS...
PATHEXT                        .COM;.EXE;.BAT;.CMD;.VBS;.VBE;.JS;.JSE;.WSF;.WSH;.MSC;.PY;.PYW;.CPL
PROCESSOR_ARCHITECTURE         AMD64
PROCESSOR_IDENTIFIER           Intel64 Family 6 Model 140 Stepping 2, GenuineIntel
PROCESSOR_LEVEL                6
PROCESSOR_REVISION             8c02
ProgramData                    C:\ProgramData
ProgramFiles                   C:\Program Files
ProgramFiles(x86)              C:\Program Files (x86)
ProgramW6432                   C:\Program Files
PSModulePath                   C:\Users\Lenny.Peng\Documents\WindowsPowerShell\Modules;C:\Program Files\WindowsPowerShell\Modules;C:\WINDOWS\system32\WindowsPowerShell\v1.0\Modules
PUBLIC                         C:\Users\Public
RTHome                         C:\S2C\PlayerPro_Runtime
S2C_Security                   1
SESSIONNAME                    Console
SystemDrive                    C:
SystemRoot                     C:\WINDOWS
TEMP                           C:\Users\LENNY~1.PEN\AppData\Local\Temp
TMP                            C:\Users\LENNY~1.PEN\AppData\Local\Temp
USERDNSDOMAIN                  XFOSS.COM
USERDOMAIN                     XFOSS
USERDOMAIN_ROAMINGPROFILE      XFOSS
USERNAME                       Lenny.Peng
USERPROFILE                    C:\Users\Lenny.Peng
windir                         C:\WINDOWS
ZES_ENABLE_SYSMAN              1
Windows 10 LTSC 企业评估版升级到完整版并激活
如果咱们下载的是 Windows 10 Enterprise LTSC 2021 评估版,就没有密钥可以激活它。
将 Windows 10 Enterprise LTSC 的 SKU 提取到 C:\Windows\System32\spp\tokens\skus, 然后以管理员权限,在 CMD 命令行窗口中运行一下命令:
cscript.exe %windir%\system32\slmgr.vbs /rilc
cscript.exe %windir%\system32\slmgr.vbs /upk >nul 2>&1
cscript.exe %windir%\system32\slmgr.vbs /ckms >nul 2>&1
cscript.exe %windir%\system32\slmgr.vbs /cpky >nul 2>&1
cscript.exe %windir%\system32\slmgr.vbs /ipk M7XTQ-FN8P6-TTKYV-9D4CC-J462D
sc config LicenseManager start= auto & net start LicenseManager
sc config wuauserv start= auto & net start wuauserv
clipup -v -o -altto c:\
echo
Hyper-V 中 Linux 虚拟机 .vhdx 文件收缩
-
登入客户机 Linux 系统,删除不需要的文件与文件夹(如有必要,将 Linux 引导至 GParted,调整其文件系统);
-
关闭 Linux 客户机。在 Hyper-V 管理器中建立一块虚拟磁盘,将其挂载到 Linux 客户机;
-
设置 Linux 客户机从光盘启动 Clonezilla,在 Clonezilla 中备份该 Linux 客户机整个磁盘;
-
在 Hyper-V 管理器中,参考原 Linux 客户机磁盘大小,建立一个新的虚拟机,然后使用 Clonezilla 将备份恢复到这个新的虚拟机。
完成上述操作后,成功实现虚拟机磁盘的压缩。
注意:在关闭原 Linux 主机时,需要手动停止(
stop) Docker 里的各个容器,并在原 Linux 主机下,停止包括 Docker 在内的各个服务,否则会出现Error response from daemon: stat /var/lib/docker/btrfs/subvolumes/[...]错误,导致恢复后,重启启动一些 Docker 容器出现问题。
PowerShell 命令备忘录
ls | grep "mubs"等价物
ls | Out-String -Stream | Select-String "mubs"
wsl 无法配置 networkingMode Nat)( 网络

需要在 “启用或关闭 Windows 功能”(按下视窗按键,输入 “windows features”)中,开启 “虚拟机平台”。
参见:Can't start distro on WSL 2.0.5 with any networkingMode besides None。