服务器管理
本文记录服务器管理方面的一些经验。
禅道 ZenTao 系统启动笔记
要启动禅道系统,首先要挂载用于备份的 /backup,然后进入 /opt/zbox,运行 ./zbox start,如下所示:
# mount 10.11.0.21:/0.135 /backup
# cd /opt/zbox
# ./zbox start
DELL HTML5 虚拟控制台
iDRAC 7 或更新的版本,就有了 HTML5 的虚拟控制台,在选择该选项时,咱们就无需 Java 环境。

而对于 Java 下所下载的 viewer.jnlp 文件,则需要使用 Temurin JRE/JDK、 IcedTea-Web 打开运行,并需要进一步的设置,比较麻烦。
参考:iDRAC Remote Console access or otherwise opening a .jnlp in a browser
执行 df -h 命令卡住问题
近日,在连接了 DELL ME5012+ME412 存储,又挂载了很多 NFS 分区的一台 Debian Bookworm 主机上,执行 df -h 时出现卡顿。原先怀疑跟 ME5012 上的 SCSI 有关系,但最终发现是所挂载的一个 NFS 分区不可用造成。遂通过 # umount -l /0.137-svn 将该有问题的 NFS 挂载加以卸载,后问题解决 df -h 命令不再挂起。
恢复 rm -rf 删除的数据
出现此类事故后,应立即关机。使用 GParted LiveCD 启动系统,sudo su - 后运行 fdisk -l,找到要恢复的磁盘设备。然后给 GParted 配置 IP 地址和 DNS 服务器。运行 apt install -y extundelete 安装 extundelete。然后直接运行 extundelete /dev/mapper/vg_vol01-home –restore-all,恢复 home 卷下的数据(应先 cd 到挂载的 NFS 目录)。
参考:
专业存储(NetApp)上的做法
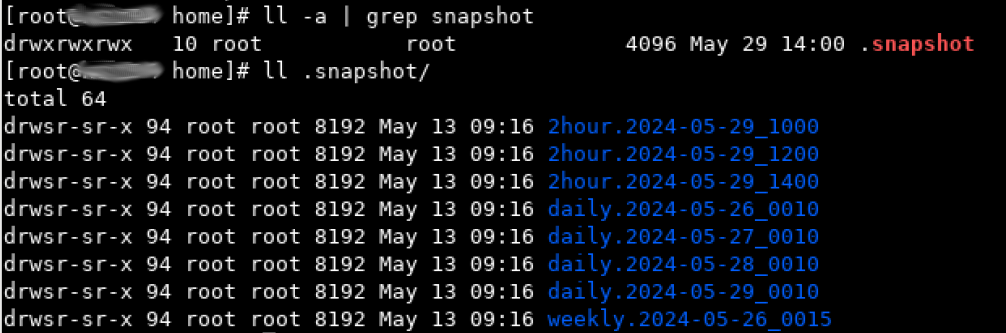
对于专业存储,都会设置合理的快照计划,比如保留 3 个每两小时快照、4 个每天快照以及 1 个每周快照。在做了这样的快照设置时,挂载了数据卷的客户机上,可以通过 cd .snapshot 命令,访问到所挂载卷的这些快照,从而在用户有恢复误删除数据需求时,可以在对应的快照下,非常容易的恢复出他们想要的数据。
比如下面的 /home 是挂载的某台 NetApp 存储上, /nishome 卷的 home 目录(卷下的 Qtree 项目)。则其快照 .snapshot 如下图所示。
H330 阵列卡 HBA 直通模式与 RAID 模式切换
HBA 模式须在 iDrac 中切换,在 UEFI 界面不会生效。
启动 iDrac 虚拟控制台
启动虚拟控制台有 Java 和 HTML5 两种方式。其中 Java 方式会下载一个 .jnlp 文件,需要 JRE 环境,且在运行这个 .jnlp 文件时,会出现签名问题而无法启动。因此需要选择 HTML5 方式启动虚拟控制台。
需要注意的是,iDrac 所使用网口 NIC 选项中,有 Dedicated/LOM1/LOM2/LOM3/LOM4,应选择的是 Dedicated。
DELL 存储开机关机顺序
-
开机:打开 “扩展柜” 电源 -> 等待 5 分钟后,打开 “控制器” 电源 -> 等待 5 分钟后,打开 “服务器” 电源
-
关机:“服务器” 关机 -> 等待 5 分钟后,“控制器(通过 Storage Manager 执行关机)” -> 等待 5 分钟后,关闭 “扩展柜” 电源
DELL ME5 多路径配置
在 Debian 12(Bookworm) 下,配置对 DELL ME5 的多路径(multipath)会很快。包含以下步骤。
-
安装
multipath-tools软件包; -
重启机器。然后运行
multipath -l或multipath -v3,根据 DM 多路径下的配置,列出 Dell PowerVault ME5 系列存储设备。
...
===== paths list =====
uuid                              hcil    dev dev_t pri dm_st chk_st vend/prod/rev        dev_st
362cea7f05d1d84002d953761a24b9173 0:2:0:0 sdb 8:16  1   undef undef  DELL,PERC H740P Mini unknown
3600c0ff00065bf8774a1056601000000 1:0:0:0 sda 8:0   10  undef undef  DellEMC,ME5          unknown
3600c0ff00065bf8774a1056601000000 1:0:1:0 sdc 8:32  50  undef undef  DellEMC,ME5          unknown
注意其中的 3600c0ff00065bf8774a1056601000000,其中两个路径的 uuid 是一致的。
- 修改配置文件
/etc/multipath.conf,该文件是multipathd服务的配置文件;
root@backup:~# cat /etc/multipath.conf
defaults {                                                                                                               find_multipaths yes
        user_friendly_names yes
}

blacklist {
}

devices {
        device {
                vendor "DellEMC"
                product "ME5"
                path_grouping_policy "group_by_prio"
                path_checker "tur"
                hardware_handler "1 alua"
                prio "alua"
                failback immediate
                rr_weight "uniform"
                path_selector "service-time 0"
        }
}
multipaths {
        multipath {
                wwid "3600c0ff00065bf8774a1056601000000"
                alias me5_vol01_20t
        }
}
- 重启服务:
systemctl restart multipathd;随后运行fdisk -l,有以下输出。
root@backup:~# fdisk -l
Disk /dev/sdc: 18.19 TiB, 19999997558784 bytes, 39062495232 sectors
Disk model: ME5
Units: sectors of 1 * 512 = 512 bytes
Sector size (logical/physical): 512 bytes / 4096 bytes
I/O size (minimum/optimal): 4096 bytes / 1048576 bytes


Disk /dev/sda: 18.19 TiB, 19999997558784 bytes, 39062495232 sectors
Disk model: ME5
Units: sectors of 1 * 512 = 512 bytes
Sector size (logical/physical): 512 bytes / 4096 bytes
I/O size (minimum/optimal): 4096 bytes / 1048576 bytes


Disk /dev/sdb: 7.28 TiB, 7999376588800 bytes, 15623782400 sectors
Disk model: PERC H740P Mini
Units: sectors of 1 * 512 = 512 bytes
Sector size (logical/physical): 512 bytes / 512 bytes
I/O size (minimum/optimal): 262144 bytes / 1048576 bytes
Disklabel type: gpt
Disk identifier: BF366EEC-4128-4E6B-80D2-7EDC93E00A4B

Device        Start         End     Sectors  Size Type
/dev/sdb1      2048      999423      997376  487M Linux filesystem
/dev/sdb2    999424     1499135      499712  244M EFI System
/dev/sdb3   1499136    17123327    15624192  7.5G Linux swap
/dev/sdb4  17123328 15623780351 15606657024  7.3T Linux filesystem


Disk /dev/mapper/me5_vol01_20t: 18.19 TiB, 19999997558784 bytes, 39062495232 sectors
Units: sectors of 1 * 512 = 512 bytes
Sector size (logical/physical): 512 bytes / 4096 bytes
I/O size (minimum/optimal): 4096 bytes / 1048576 bytes
- 可以看到
Disk /dev/mapper/me5_vol01_20t: 18.19 TiB, 19999997558784 bytes, 39062495232 sectors已经出现,随后即可使用磁盘工具对其格式化并加以使用。
Debian 下格式化多路径的块设备
经由 multipathd 建立的多路径下的块设备,比如 /dev/mapper/me5_vol01_20ti,在使用命令 sudo gparted /dev/mapper/me5_vol01_20ti,欲对其进行分区格式化创建文件系统以加以利用时,发现总是会报出 Device or resource busy 错误。
有人的解决办法,是暂时移除多路径设备的映射。步骤如下:
-
移除多路径设备名字。(
multipath -f /dev/mappper/me5_vol01_20ti); -
对多路径从设备运行
gparted。(如:sudo gparted /dev/sdb); -
重建多路径设备映射。(
multipath -r)。
注意:在移除多路径设备时,若多路径设备已被挂载,那么会报出以下错误:
root@backup:~# multipath -f /dev/mapper/me5_vol01_20t
59172.163246 | me5_vol01_20t-part1: map in use
在排除了对该多路径设备的已有挂载后,移除多路径设备的命令将不再报错。
参考:
存储上新加卷后 Linux 主机上找不到的问题
近日我在 DELL/EMC ME5012 上,从存储池创建出一个新卷后,无法在 Linux 主机上,通过 fdisk -l 找到。随后联系 DELL 技术支持工程师,按照他们所提供的资料,运行命令 # /usr/bin/rescan-scsi-bus.sh -a 后,成功发现这一存储上的新加卷。
Disk /dev/sdg: 3.18 TiB, 3499999887360 bytes, 6835937280 sectors
Disk model: ME5
Units: sectors of 1 * 512 = 512 bytes
Sector size (logical/physical): 512 bytes / 4096 bytes
I/O size (minimum/optimal): 4096 bytes / 1048576 bytes


Disk /dev/sdh: 3.18 TiB, 3499999887360 bytes, 6835937280 sectors
Disk model: ME5
Units: sectors of 1 * 512 = 512 bytes
Sector size (logical/physical): 512 bytes / 4096 bytes
I/O size (minimum/optimal): 4096 bytes / 1048576 bytes


Disk /dev/mapper/mpathb: 3.18 TiB, 3499999887360 bytes, 6835937280 sectors
Units: sectors of 1 * 512 = 512 bytes
Sector size (logical/physical): 512 bytes / 4096 bytes
I/O size (minimum/optimal): 4096 bytes / 1048576 bytes
该脚本来自 sg3-utils 软件包,Debian Linux 自带了这个软件包(软件包:sg3-utils)。
大多数操作系统都有 SCSI 直通接口,SCSI pass-through interfaces, 可让用户空间程序,user space programs,向设备发送 SCSI 命令并获取响应。通过 SCSI 到 ATA 转换,SCSI to ATA Translation, SAT,许多 ATA 磁盘现在都能处理 SCSI 命令。通常情况下,这个软件包中的每个实用程序,都能实现一条 SCSI 命令。有关 SCSI 命令和 SAT 的定义,请参见 www.t10.org 上的标准草案。ATA 命令定义在 www.t13.org 的标准草案中。有关本软件包中支持的 SCSI 和 ATA 命令与实用程序名称之间的映射,请参阅
COVERAGE文件。
btrfs 分区的挂载
临时挂载 btrfs 分区,直接运行命令 sudo mount /dev/mapper/me5_vol01_20ti-part1 /0.135,即可把 /dev/mapper/me5_vol01_20ti-part1 挂载到主机的 /0.135 目录下。
要将此挂载设置,写入到 /etc/fstab,就需要先找到 btrfs 设备的信息,通过以下方式之一:
# btrfs filesystem show /mount/point/
# btrfs filesystem show /dev/DEVICE
# btrfs filesystem show /dev/sda
# btrfs filesystem show
比如:
root@backup:~# btrfs filesystem show
Label: none  uuid: e508b096-1641-41aa-96f4-37548f6e33dd
        Total devices 1 FS bytes used 24.56GiB
        devid    1 size 7.27TiB used 45.02GiB path /dev/sdd4

Label: none  uuid: ca060281-526e-4a88-b9f5-296a32624c9b
        Total devices 1 FS bytes used 78.37MiB
        devid    1 size 487.00MiB used 216.00MiB path /dev/sdd1

Label: none  uuid: 8447d73b-fd92-4ee1-9769-af1961ceb79c
        Total devices 1 FS bytes used 144.00KiB
        devid    1 size 195.31GiB used 2.02GiB path /dev/mapper/me5_vol01_20t-part1
mount 命令语法
root@backup:~# mkdir /data/
root@backup:~# mount /dev/mapper/me5_vol01_20t-part1 /data
root@backup:~# btrfs filesystem df /data
Data, single: total=8.00MiB, used=0.00B
System, DUP: total=8.00MiB, used=16.00KiB
Metadata, DUP: total=1.00GiB, used=128.00KiB
GlobalReserve, single: total=3.50MiB, used=0.00B
/etc/fstab 文件语法
首先要找出设备的 UUID,请输入:
# blkid /dev/mapper/me5_vol01_20t-part1
或
# lsblk --fs /dev/mapper/me5_vol01_20t-part1
将输出:
root@backup:~# blkid /dev/mapper/me5_vol01_20t-part1
/dev/mapper/me5_vol01_20t-part1: UUID="8447d73b-fd92-4ee1-9769-af1961ceb79c" UUID_SUB="04798ed7-4ad0-4ea2-b2e1-154fae497871" BLOCK_SIZE="4096" TYPE="btrfs" PARTUUID="2cd4eb20-779e-4c8c-9d73-82280115407e"
root@backup:~# lsblk --fs /dev/mapper/me5_vol01_20t-part1
NAME                FSTYPE FSVER LABEL UUID                                 FSAVAIL FSUSE% MOUNTPOINTS
me5_vol01_20t-part1 btrfs              8447d73b-fd92-4ee1-9769-af1961ceb79c
root@backup:~# lsblk --fs /dev/mapper/me5_vol01_20t-part2
NAME                FSTYPE FSVER LABEL UUID                                 FSAVAIL FSUSE% MOUNTPOINTS
me5_vol01_20t-part2 btrfs              34d15471-e8b1-401e-94cd-f4465e6ad4ba
然后编辑 /etc/fstab,下面的语法,是使用 UUID 把 btrfs 设备挂载于 /0.135 和 /me5_vol01_part2 两个挂载点:
UUID=8447d73b-fd92-4ee1-9769-af1961ceb79c /0.135           btrfs   defaults        0       0
UUID=34d15471-e8b1-401e-94cd-f4465e6ad4ba /me5_vol01_part2          btrfs   defaults        0       0
NFS 磁盘配额
经测试,在 /etc/exporfs 的导出项参数中,通过加入 du=1000000 这样的参数,实现磁盘配额,会报出如下错误。
unknown keyword "du=100000000"
故要实现 NFS 导出的限额,需要其他途径。而 BTRFS 文件系统,原生支持子卷的配额,因此可通过 BTRFS 的这一特性,实现这一需求。
前提条件
服务器上已有两块 SAS 盘组成的 RAID-1 阵列卷,并使用 GParted 创建出一个 BTRFS 的分区 /sas_disks。
创建子卷
以下命令需在 root 账号下执行。
cd /sas_disks
btrfs subvolume create rdp-1.50_share
运行 btrfs subvolume list /sas_disks,可列出 /sas_disks 下的子卷。
配额设置
首先开启 /sas_disks 的配额。
btrfs quota enable /sas_disks
然后建立 /sas_disks 配额的 qgroup。
btrfs subvolume list /sas_disks | cut -d' ' -f2 | xargs -I{} -n1 btrfs qgroup create 0/{} /sas_disks
btrfs quota rescan /sas_disks
最后设置 rdp-1.50_share 子卷的配额限制。
btrfs qgroup limit 100G /sas_disks/rdp-1.50_share
通过 btrfs qgroup show -reF /sas_disks/rdp-1.50_share 检查对 rdp-1.50_share 的配额设置。
btrfs qgroup show -reF /sas_disks/rdp-1.50_share/
Qgroupid    Referenced    Exclusive  Max referenced  Max exclusive   Path
--------    ----------    ---------  --------------  -------------   ----
0/256         16.00KiB     16.00KiB       100.00GiB           none   rdp-1.50_share
挂载 BTRFS 子卷
执行以下命令,可临时将 BTRFS 子卷挂载到系统中。其中 subvol=rdp-1.50_share 是 /sas_disks 下 rdp-1.50_share 的路径,可通过 btrfs subvolume list -p /sas_disks 看到;/dev/sdc1 是 /sas_disks 所对应的分区。
mount -o subvol=rdp-1.50_share /dev/sdc1 /rdp-1.50_share
在 /etc/fstab 中,写入下面这样的配置行,即可永久挂载 BTRFS 的子卷。其中 /dev/sdc1 是 /sas_disks 对于的磁盘分区,subvolid=256 是执行 btrfs subvolume list /sas_disks 所见的 rdp-1.50_share 子卷的子卷 id。
/dev/sdc1 /rdp-1.50_share btrfs defaults,compress=lzo,commit=120,subvolid=256 0 0
参考:
存储文件数量限制导致可用空间为 0
运行 df -i,可以看到 IUse% 为 100%。此时即使存储还有可用空间,程序仍会报出可用空间为 0。解决方法:调整存储的文件数量限制。以 NetApp 为例:
FAS2750::> voloume modify -vserver svm_data -volume tempdata -files 200000000
随后运行 df -i,将显示挂载的存储卷 IUse% 已降至低于 100%。
df -i 的示例输出:
% df  -i
Filesystem      Inodes  IUsed   IFree IUse% Mounted on
tmpfs           122560    624  121936    1% /run
/dev/sda       1605632 289295 1316337   19% /
tmpfs           122560      1  122559    1% /dev/shm
tmpfs           122560      3  122557    1% /run/lock
tmpfs            24512     25   24487    1% /run/user/1000
数据备份
#!/usr/bin/env bash

#
# 2024-05-20
#
# Optimized the criteria of rsync execution
#


# 2024-05-14
#
# Optimized xfoss-com backup deeply
#
#

declare -A backup_dir
# For analog_project
backup_dir["xfoss-com/doc"]="/opt"
backup_dir["xofss-com/test/sos"]="/opt"
backup_dir["xfoss-com/temp/doc"]="/opt"

do_backup() {
        if [ ! -d "${2}" ]; then mkdir -p "${2}"; fi

        if [ -d "${1}" ] && [ ! -z "$(ls -A ${1})" ] && [ $(ps -ef | grep "find" | grep "${2}" | wc -l) -eq 0 ]; then
                cd "${1}"
                /usr/bin/rsync -cdlptgo --delete --exclude '.snapshot' --exclude 'tmp' . ${2}
                find . -maxdepth 1 -type d -not -name "." -not -name ".snapshot" -not -name "tmp" -exec /usr/bin/rsync -crulptgo --delete {} ${2} \;
        fi
}

for name in ${!backup_dir[@]}; do
        do_backup "/${name}" "${backup_dir[$name]}/${name}" $name
done
注意:
find . -maxdepth 1 -type d -not -name "." -not -name ".snapshot" -not -name "tmp" -exec /usr/bin/rsync -crulptgo --delete {} ${2} \;行中最后的
\;需要保留,否则会报出
find: missing argument to -exec'错误。
对于备份数据量大、文件数目多的数据,此备份脚本将其分解为较小的部分,以减小 rsync 所用到增量文件大小,有效提升备份速度。
将 do_backup 提取到库文件,并根据备份数据性质调整增量更新频率为每天、每周
projects_backup.lib.sh:
do_backup() {                                                                                                                                                                                                                                            if [ ! -d "${2}" ]; then mkdir -p "${2}"; fi

        if [ -d "${1}" ] && [ ! -z "$(ls -A ${1})" ] && [ $(ps -ef | grep "find" | grep "${2}" | wc -l) -eq 0 ]; then
                cd "${1}"
                /usr/bin/rsync -cdlptgo --delete --exclude '.snapshot' --exclude 'tmp' . ${2}
                find . -maxdepth 1 -type d -not -name "." -not -name ".snapshot" -not -name "tmp" -exec /usr/bin/rsync -crulptgo --delete {} ${2} \;
        fi
}


declare -A backup_dir
projects_backup.daily.sh:
#!/usr/bin/env bash
source projects_backup.lib.sh

#
# 2024-05-20
#
# Optimized the criteria of rsync execution
#


# 2024-05-14
#
# Optimized analog_project backup deeply
#
#


# For Test SVN
backup_dir["0.135-svn"]="/me5_vol01_part2"


# For Software/BSP/SDK
backup_dir["1.22-gitlab"]="/me5_vol01_part2/scm-data"
backup_dir["0.137-svn"]="/me5_vol01_part2"

for name in ${!backup_dir[@]}; do
        do_backup "/${name}" "${backup_dir[$name]}/${name}" $name
done
更新:修改 project_backup.lib.sh,加入不带 --delete 参数选项
do_backup() {                                                                                                                                                                                                  #
        #       Parameter list:
        #
        #       ${1} - backup source
        #       ${2} - backup destination
        #       ${3} - whether it is a keep rsync mode, 0 - not keep, 1 - keep
        #
        if [ ! -d "${2}" ]; then mkdir -p "${2}"; fi

        if [ -d "${1}" ] && [ ! -z "$(ls -A ${1})" ] && [ $(ps -ef | grep "find" | grep "${2}" | wc -l) -eq 0 ] && [ $(ps -ef | grep "tar" | grep "${2}" | wc -l) -eq 0 ]; then
                cd "${1}"
                if [ ${3} -eq 0 ]; then
                        /usr/bin/rsync -cdlptgo --delete --exclude '.snapshot' --exclude 'tmp' . ${2}
                        find . -maxdepth 1 -type d -not -name "." -not -name ".snapshot" -not -name "tmp" -exec /usr/bin/rsync -crulptgo --delete {} ${2} \;
                fi

                if [ ${3} -eq 1 ]; then
                        /usr/bin/rsync -cdlptgo --exclude '.snapshot' --exclude 'tmp' . ${2}
                        find . -maxdepth 1 -type d -not -name "." -not -name ".snapshot" -not -name "tmp" -exec /usr/bin/rsync -crulptgo {} ${2} \;
                fi
        fi
}
单向上传通道
建立从办公网到研发内网的单向上传通道,是研发型机构的一般需求。通过 OpenSSH-Server 的配置文件 /etc/ssh/sshd_config,可实现此需求。
在配置文件中,添加如下配置:
Match address 10.11.1.0/24
        ForceCommand internal-sftp -R
        PasswordAuthentication yes

Match address 10.11.2.0/24
        ForceCommand internal-sftp -R
        PasswordAuthentication yes
其中 10.11.1.0/24 和 10.11.2.0/24 分别是两个级别不同的研发网段。如此设置后,便只能从研发网段下载文件数据而无法上传,且无法 SSH 登录。
[hector.peng@vnc03.xfoss.com]$ ssh it@dl.xfoss.com
hector.peng@dl.xfoss.com's password:
This service allows sftp connections only.
Connection to dl.xfoss.com closed.
仅 sftp 连接而无法 SSH 登录的配置
# override default of no subsystems                                                                                     # Subsystem     sftp    /usr/lib/openssh/sftp-server
Subsystem       sftp    internal-sftp

# Example of overriding settings on a per-user basis
#Match User anoncvs
#       X11Forwarding no
#       AllowTcpForwarding no
#       PermitTTY no
#       ForceCommand cvs server
Match group sftponly
        ChrootDirectory /upload
        X11Forwarding no
        AllowTcpForwarding no                                                                                                   AllowAgentForwarding no
        ForceCommand internal-sftp -d /%u
#       PermitTTY no
#       ForceCommand cvs server
效果如下。
This service allows sftp connections only.
Connection to f.xfoss.com closed.
OpenSSH Server 安全加固
全局关闭 PasswordAuthentication,并对特定组开启 PasswordAuthentication,是 OpenSSH Server 安全加固的一项有效措施。
PasswordAuthentication no

Match group sftponly                                                                                                                                     ChrootDirectory /upload
        X11Forwarding no
        AllowTcpForwarding no
        AllowAgentForwarding no
        ForceCommand internal-sftp -d /%u
        PasswordAuthentication yes
Match User hector.peng
        PasswordAuthentication yes
参考:
svnserve 通过 SASL 与 LDAP(MS AD) 集成
svnserve,是提供 svn 代码仓库访问方式的一个服务器。SASL,Simple Authentication and Secure Layer,简单身份验证和安全层,是通过可替换机制,在面向连接的协议中,提供身份验证和数据安全服务的框架。
配置过程:
-
安装
cyrus-sasl、cyrus-sasl-lib、cyrus-sasl-plain包; -
修改
/etc/sysconfig/saslauthd文件;
MECH=ldap
FLASS="-O /etc/saslauthd.conf"
- 创建
/etc/saslauthd.conf文件
ldap_servers: ldap://x.x.x.x
ldap_default_domain: xfoss.com
ldap_bind_dn: cn=admin,cn=Users,dc=xfoss,dc=com
ldap_bind_pw: password
ldap_search_base: dc=xfoss,dc=com
ldap_filter: (sAMAccountName=%u)
ldap_password_attr: userPassword
ldap_deref: never
ldap_restart: yes
ldap_scope: sub
ldap_use_sasl: no
ldap_start_tls: no
ldap_version: 3
ldap_auth_method: bind
ldap_timeout: 10
ldap_cache_ttl: 30
ldap_cache_mem: 32786
- 创建
/etc/sasl2/svn.conf
pwcheck_method:saslauthd
mech_list:plain login
- 重启
sasl服务并加入开机自启
systemctl restart saslauthd
systemctl enable saslauthd
- 测试连接
#testsaslauthd -u xxx -p passwd
如果成功,报 OK “Success.”
INFO: task nfsd:3685 blocked for more than 120 seconds.
nfsd 失去响应,所有连接 NFS 存储的服务器均出现 df -h 卡住等问题。此时运行 systemctl restart nfs-server.service 没有响应。
检查 dmesg 输出,发现有下面相关的内核日志。
[19843.265950] receive_cb_reply: Got unrecognized reply: calldir 0x1 xpt_bc_xprt 00000000a7643dda xid 12eeea51
[19843.265971] receive_cb_reply: Got unrecognized reply: calldir 0x1 xpt_bc_xprt 000000002ec8ff43 xid fcf6f123
[19843.269606] receive_cb_reply: Got unrecognized reply: calldir 0x1 xpt_bc_xprt 00000000a7643dda xid 13eeea51
[19843.270046] receive_cb_reply: Got unrecognized reply: calldir 0x1 xpt_bc_xprt 0000000071d13487 xid 46f89061
[19843.321438] receive_cb_reply: Got unrecognized reply: calldir 0x1 xpt_bc_xprt 000000002ec8ff43 xid fdf6f123
[19843.494233] receive_cb_reply: Got unrecognized reply: calldir 0x1 xpt_bc_xprt 0000000071d13487 xid 47f89061
[19943.899020] receive_cb_reply: Got unrecognized reply: calldir 0x1 xpt_bc_xprt 00000000a7643dda xid 24eeea51
[19943.900877] receive_cb_reply: Got unrecognized reply: calldir 0x1 xpt_bc_xprt 00000000a7643dda xid 25eeea51
[19943.908586] receive_cb_reply: Got unrecognized reply: calldir 0x1 xpt_bc_xprt 000000002ec8ff43 xid 1ef7f123
[19944.556653] receive_cb_reply: Got unrecognized reply: calldir 0x1 xpt_bc_xprt 0000000071d13487 xid 58f89061
[19944.559957] receive_cb_reply: Got unrecognized reply: calldir 0x1 xpt_bc_xprt 0000000071d13487 xid 59f89061
[19945.002177] receive_cb_reply: Got unrecognized reply: calldir 0x1 xpt_bc_xprt 000000002ec8ff43 xid 1ff7f123
[20129.036150] receive_cb_reply: Got unrecognized reply: calldir 0x1 xpt_bc_xprt 00000000a7643dda xid 45eeea51
[20129.595366] receive_cb_reply: Got unrecognized reply: calldir 0x1 xpt_bc_xprt 00000000a7643dda xid 46eeea51
[20130.079228] receive_cb_reply: Got unrecognized reply: calldir 0x1 xpt_bc_xprt 0000000071d13487 xid 79f89061
[20130.079611] receive_cb_reply: Got unrecognized reply: calldir 0x1 xpt_bc_xprt 0000000071d13487 xid 7af89061
[20130.236858] receive_cb_reply: Got unrecognized reply: calldir 0x1 xpt_bc_xprt 000000002ec8ff43 xid 3ef7f123
[20130.239765] receive_cb_reply: Got unrecognized reply: calldir 0x1 xpt_bc_xprt 0000000071d13487 xid 7cf89061
[20131.413303] receive_cb_reply: Got unrecognized reply: calldir 0x1 xpt_bc_xprt 000000002ec8ff43 xid 3ff7f123
[20131.413417] receive_cb_reply: Got unrecognized reply: calldir 0x1 xpt_bc_xprt 000000002ec8ff43 xid 40f7f123
[20240.758088] receive_cb_reply: Got unrecognized reply: calldir 0x1 xpt_bc_xprt 00000000a7643dda xid 5beeea51
[20243.725866] receive_cb_reply: Got unrecognized reply: calldir 0x1 xpt_bc_xprt 0000000071d13487 xid 90f89061
[20243.725883] receive_cb_reply: Got unrecognized reply: calldir 0x1 xpt_bc_xprt 000000002ec8ff43 xid 56f7f123
[20421.328248] INFO: task nfsd:3684 blocked for more than 120 seconds.
[20421.328264]       Not tainted 6.1.0-20-amd64 #1 Debian 6.1.85-1
[20421.328270] "echo 0 > /proc/sys/kernel/hung_task_timeout_secs" disables this message.
[20421.328275] task:nfsd            state:D stack:0     pid:3684  ppid:2      flags:0x00004000
[20421.328287] Call Trace:
[20421.328291]  <TASK>
[20421.328298]  __schedule+0x34d/0x9e0
[20421.328314]  schedule+0x5a/0xd0
[20421.328322]  schedule_timeout+0x118/0x150
[20421.328333]  wait_for_completion+0x86/0x160
[20421.328343]  __flush_workqueue+0x152/0x420
[20421.328360]  nfsd4_destroy_session+0x1b6/0x250 [nfsd]
[20421.328487]  nfsd4_proc_compound+0x352/0x660 [nfsd]
[20421.328622]  nfsd_dispatch+0x19e/0x2b0 [nfsd]
[20421.328723]  svc_process_common+0x286/0x5e0 [sunrpc]
[20421.328950]  ? svc_recv+0x4e2/0x890 [sunrpc]
[20421.329173]  ? nfsd_svc+0x360/0x360 [nfsd]
[20421.329284]  ? nfsd_shutdown_threads+0x90/0x90 [nfsd]
[20421.329394]  svc_process+0xad/0x100 [sunrpc]
[20421.329561]  nfsd+0xd5/0x190 [nfsd]
[20421.329668]  kthread+0xd7/0x100
[20421.329677]  ? kthread_complete_and_exit+0x20/0x20
[20421.329685]  ret_from_fork+0x1f/0x30
[20421.329697]  </TASK>
经查询,此问题涉及 NFS 在 Linux 上实现的底层问题。对内核参数进行以下优化,并在观察是否有效中。
vm.dirty_background_ratio=5
vm.dirty_ratio=10

net.ipv4.tcp_syncookies = 1
net.ipv4.tcp_tw_reuse = 1
# net.ipv4.tcp_tw_recycle = 1 // deprecated since kernel 4.x
net.ipv4.tcp_fin_timeout = 30
更新 1:昨日(2024-07-04),同事建议重新按照 NFS 服务器相关的软件包,有望解决此问题。随后进行了此操作,目前已经稳定运行超过 17 小时。似乎问题已经解决。
其中 /etc/default/nfs-kernel-server 配置如下:
# cat /etc/default/nfs-kernel-server
# Number of servers to start up
RPCNFSDCOUNT=8

# Runtime priority of server (see nice(1))
RPCNFSDPRIORITY=0

# Options for rpc.mountd.
# If you have a port-based firewall, you might want to set up
# a fixed port here using the --port option. For more information,
# see rpc.mountd(8) or http://wiki.debian.org/SecuringNFS
# To disable NFSv4 on the server, specify '--no-nfs-version 4' here
RPCMOUNTDOPTS="--manage-gids"

# Do you want to start the svcgssd daemon? It is only required for Kerberos
# exports. Valid alternatives are "yes" and "no"; the default is "no".
NEED_SVCGSSD=""

# Options for rpc.svcgssd.
RPCSVCGSSDOPTS=""
更新 2:虽然上述重新安装后运行了超过 20 小时,但随后又出现了 NFS 服务不可用问题。遂做以下内核优化,并观察是否有效。并寻求在 NFS 客户端上,使用软挂载(soft mount),以根本解决问题。
# sysctl -p
net.ipv6.conf.all.disable_ipv6 = 1
net.ipv6.conf.default.disable_ipv6 = 1
net.core.rmem_max = 67108864
net.core.wmem_max = 67108864
net.ipv4.tcp_rmem = 4096 87380 33554432
net.ipv4.tcp_wmem = 4096 65536 33554432
net.ipv4.tcp_mtu_probing = 1
net.core.default_qdisc = fq
vm.dirty_background_ratio = 20
vm.dirty_ratio = 40
vm.dirty_writeback_centisecs = 200
vm.dirty_expire_centisecs = 15000
vm.vfs_cache_pressure = 50
net.ipv4.tcp_syncookies = 1
net.ipv4.tcp_tw_reuse = 1
net.ipv4.tcp_fin_timeout = 30
net.ipv4.tcp_keepalive_time = 1200
net.ipv4.ip_local_port_range = 1024 65000
net.ipv4.tcp_max_syn_backlog = 8192
net.ipv4.tcp_max_tw_buckets = 5000
更新 3:修改原先 /etc/exports 中导出条目选项 sync 为 async,并观察是否有效。
# /0.135/ 10.11.0.135/32(rw,async,no_root_squash,no_all_squash,no_subtree_check)
/0.135/ 10.11.0.135/32(rw,async,no_root_squash,no_all_squash,no_subtree_check)
更新 4:根据下面的参考连接,/etc/exports 中的 async 指的是 NFS 服务端支持同时的读/写,而 sync 则与此相反。而在没有指定 sync/async 时,默认是 sync。因此已将 /etc/exports 中的该选项回退到 sync。
参考:
Re: Need some clarification about async and sync option of /etc/exports
CPU stall, eventual host hang with BTRFS + NFS under heavy load
An NFS client hangs on various operations, including "df". Hard vs Soft NFS mounts.
Red Hat Enterprise Linux 5 (RHEL 5) - NFS Process in "D" State: Uninterruptable Sleep
VMAX AFA 和 PowerMax:在运行嵌入式 NAS 8.1.15.401 和 NFSv4 装载的文件系统时,由于线程受阻而导致 DM 死机后,VDM 无法加载。